How to Re-finish Your Bass Neck?
Man years ago when I was first learning to play the bass, my teacher
would let me try and play his (nice)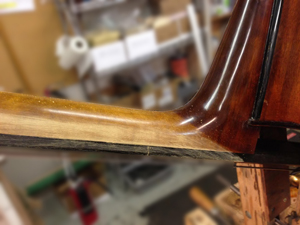 bass. I noticed how easy it was to shift on and how much better it
'felt' than my own instrument. My bass had the same finished varnish
on the neck as was on the rest of the bass. His neck had a
nice sheen on it, but felt thin and slippery. That's good: The least amount of stickiness on your neck, the better it will feel
to shift on when you play. His bass not only felt better, it
looked way nicer as well. bass. I noticed how easy it was to shift on and how much better it
'felt' than my own instrument. My bass had the same finished varnish
on the neck as was on the rest of the bass. His neck had a
nice sheen on it, but felt thin and slippery. That's good: The least amount of stickiness on your neck, the better it will feel
to shift on when you play. His bass not only felt better, it
looked way nicer as well.
Click any photo on this page for larger image.
Many basses today, (even this carved Wilfer bass pictured)
will often come with a varnished neck. (I am referring to the back
maple part, not the fingerboard.) The only real reason that we find
necks varnished is that it is quicker and easier for the bass maker
(factory). If they sanded the neck down at the time of
finishing the bass and properly oil finished the neck, it would only
take a few extra minutes: Necks are not supposed to be varnished!
Items you will need:
- Sandpaper, in #220, 400 and then 600 grit (If you
really want to save money, you can just do the 220 grit and then
jump to 600. It will just take a bit longer is all.) All
you will need is one sheet of each. Home Depot sells packs
of differing grades together, but check the grits on the package
before you buy it.
- Kitchen paper towels. We use a lot of these!!!!
- Super fine steel wool (optional, but I use it for sure!) By
super fine, I mean #0000. Don't go any coarser than 4
zeros!
- Watco Danish Oil, Natural color (More about this
below)
You can often see what the back of the neck varnish is by a worn rut
where you thumb slides on (over time), or a glassy, thick looking
neck. In this photo where I started to sand, one can see the
thick varnish coming off.
First, since you do not have a 'bass repair table' like we do
here, you can simply hold your bass against you as if you are going
to play it and sand it vertically (no need to remove strings
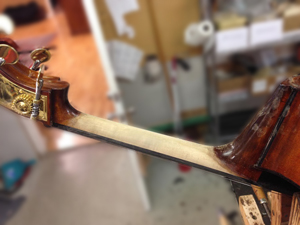
or anything like that). Most always there is a color line at the beginning of
the neck where the dark varnish color ends and then starts again at
the bottom of the neck heal. Depending on how thick that
varnish/lacquer is, you will first need to take that finish off with
some sandpaper. This is where I use the #220 grit. You
can sand all over (wherever you see the lighter color) and remove
that thick varnish. Be
mindful of that imaginary line where the light color ends at the top
and bottom of the neck and the regular (brown) finish starts.
Try your best to go right up to that line and stop.
Especially with the rougher #220 you don't want to overlap into the
bass' varnish too much. If you do occasionally
bump into it or cross over there, no biggie, you can fix it later
as we will explain here. BTW, when I use my sandpaper, I tear the
new sheet in quarters. Each quarter then is folded into
quarters as well. This way I have a small controllable space
to work with and can flip over or fold for fresh new paper when I
need it.
- After the 220 grit, then I go one round on 400 grit. I
do this only because I have huge surpluses of sandpaper here so
if you want to save money on paper, you can just go from the
#220 to the #600.
After you removed all the thick varnish off the back of your neck,
then it's time to move to the higher 400 or 600 grit. This just makes the bare wood smoother and
gets it ready for the final finishing. After you feel that you
have got the wood as fine and smooth as possible using that 600 grit
paper, it's time to get a wet (clean) rag or paper towel and wet
the bare wood. This will greatly bring out the grain.
Let it dry for a few minutes and then re-sand again with the same
600 grit paper. Try not to get the sandpaper on the ebony
fingerboard
at this stage because the ebony dust will get into the bare neck
wood (which is usually maple), and then it will discolor the wood.
If that happens, no biggie, just re-sand that part again to clean it
out and get it nice and 'white' again. Do this wet stage 3 times!
So again, wet, then let it dry, then sand it. Then wet it again...
well you get the idea. Do that 3 times. By the 3rd time you
will notice that the neck is smoother than it was the first time you
wet it. Do one quick light sanding an then wipe off all the
dust that is laying around the neck or bass with a dry paper towell.
After the last (3rd) sanding, do not wet the neck, but just
wipe the dust off.
Here, if you accidentally made a few scratches with the #220 into
the neck base (darker) color, you can wet sand (use water and liquid
soap) and lightly sand the finish (where the scratch is). Don
't use the 220 grit though!!! You can also lightly sand
the area where the light color transitions into the dark so that it
is more subtle. Usually 600 grit is enough, but if you are
really worried about taking the finish or color off there (at the
base), you can use a really fine grit sandpaper, like 1500 grit or
2000. Always use water and soap. This will keep any
scratching down to a minimum then. The soap will nicely
lubricate the sand paper to minimize any harshness. If you
want or need to use the 1500 type grit paper, you will not easily
see it at HD or Lowes, but a woodworking store near should have it
in stock.
Now you are ready to apply the Danish oil. I use
Watco's Danish Oil instead of boiled linseed oil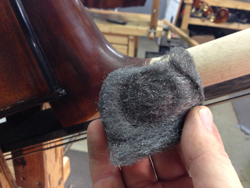 because I like the quick
dry hardness more with the Danish Oil. You can buy Watco in
several colors. First, we usually go for the "Natural" because
it naturally enhances the wood grain and adds quite a nice color to
it too just by itself. On some basses you might like it slightly darker (just
slightly!!) If this is more of what you want, then use their "Light Walnut
color. At
the time of this writing, I don't recall what colors places like
Home Depot offer, but you can also find this product at woodworking
supply stores as well. I use the 'Natural' color on about 90%
of the time. In some rarer occasions, you might have an
unusual dark wood streak or something odd like that on the maple
neck (Chinese bass necks can sometimes show some dark streaks in
them and it is totally natural. This would be a good example
of using the "Light Walnut" color as it will help it blend nicely.
Only in super rare occasions would I ever need or want to go any
darker than the light walnut. Personally, I just think then it
gets too dark looking and is not as attractive. because I like the quick
dry hardness more with the Danish Oil. You can buy Watco in
several colors. First, we usually go for the "Natural" because
it naturally enhances the wood grain and adds quite a nice color to
it too just by itself. On some basses you might like it slightly darker (just
slightly!!) If this is more of what you want, then use their "Light Walnut
color. At
the time of this writing, I don't recall what colors places like
Home Depot offer, but you can also find this product at woodworking
supply stores as well. I use the 'Natural' color on about 90%
of the time. In some rarer occasions, you might have an
unusual dark wood streak or something odd like that on the maple
neck (Chinese bass necks can sometimes show some dark streaks in
them and it is totally natural. This would be a good example
of using the "Light Walnut" color as it will help it blend nicely.
Only in super rare occasions would I ever need or want to go any
darker than the light walnut. Personally, I just think then it
gets too dark looking and is not as attractive.
Now that your neck is sanded, prepped and clean, take a nice clump
of the fine steel wool and dab some of the Danish Oil on it.
Even though I can see wood is
covered by the oil, I stay with it for about a minute, softly
rubbing with that fine steel wool and oil. You can
also lightly work the Danish Oil into the nearby neck varnish, but
just feather it in. Don't press it in too much with the steel
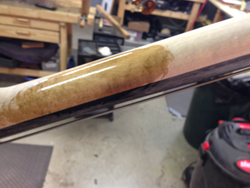
wool. This way, you will get a nice transition. (In the
photo here the Danish Oil is much darker when it is applied, but
immediately lightens up when it is wiped dry.)
Then, immediately take a clean paper towel and wipe
the neck wipe completely dry. In the end, take another clean (new)
sheet of paper towel and buff the neck with some warm pressure
(elbow grease). This brings a nice
final sheen to the neck. From start to finish, this whole
project should only take
about 15 - 30 minutes depending on the detail required.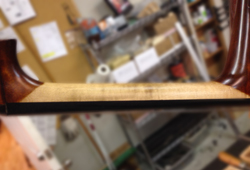
You're done! Enjoy your new neck. Isn't it nice to play
on now???? I always like that fresh oil smell too!! For older basses that
have already had this similar process, you can also clean or refresh a
sticky neck by the same process or simply using the steel wool over
the neck first (without sandpaper) and then applying the oil and
wiping it off. I do this on my Italian bass every 4 or 5 years,
so it keeps nice for a very long time. This last photo is not
my best focus work...done with my Iphone!
|